10 iPhone Camera Settings to Change Today for Better Photos
Want better iPhone photos? Explore 10 camera settings that can improve composition, exposure, image detail, and low-light photography. Learn how to adjust your camera for sharper, more balanced pictures.

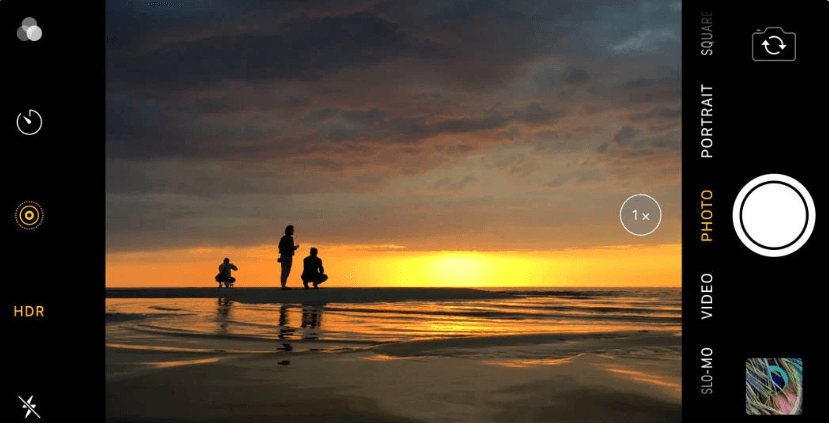
TL;DR: Your iPhone camera is already capable of taking impressive photographs, but the default settings may not always give you the results you want. A few adjustments can make a noticeable difference to image composition, exposure, sharpness, colours, and overall detail. Start by enabling Grid and Level, choosing the right photo resolution, keeping Lens Correction switched on, adjusting exposure manually, and exploring Photographic Styles. You should also review Live Photos, Night Mode, Macro Control, and Preserve Settings. These changes do not require a photography app or professional equipment. However, the best combination depends on your iPhone model, available storage, lighting conditions, and how you intend to use your pictures.
1. Turn On Grid And Level For Better Composition
One of the easiest ways to improve your iPhone photography is to enable the Grid and Level features. They help you position subjects more carefully, keep horizons straight, and create balanced photographs. Whether you are capturing a landscape, taking pictures of food, or clicking a quick portrait, a little attention to composition can make an ordinary photograph look considerably more polished.
To enable these features, open Settings > Camera and switch on Grid and Level. The Grid displays horizontal and vertical lines across the camera preview, dividing the frame into sections. You can use these lines to apply the rule of thirds, which involves positioning important subjects along the lines or at their intersections instead of always placing them directly in the centre.
The Level feature is particularly useful when photographing buildings, landscapes, and flat surfaces from above. It helps you identify when your camera is tilted, reducing the need to straighten every photograph afterwards. Neither feature changes the actual image quality, but both help you capture better-composed photographs from the beginning.
2. Choose The Right Photo Resolution
Your iPhone's photo resolution determines how much image detail it can capture. Depending on the model, you may have options such as 12MP, 24MP, or 48MP. A higher resolution can preserve more detail, which is useful when photographing landscapes, architecture, products, or subjects that you might want to crop later.
On supported iPhones, go to Settings > Camera > Formats > Photo Mode to select between available resolution options. Some newer models offer a 24MP default setting, while compatible devices also support 48MP photography. To access 48MP capture, you may need to enable Resolution Control or ProRAW & Resolution Control in the Formats menu. The available options depend on your device.
However, choosing the highest resolution for every photograph is not necessarily the best decision. Higher-resolution images can occupy more storage, and the difference may be difficult to notice when viewing pictures on a phone screen or sharing them on social media. For everyday photography, 24MP is a practical option where available. Save 48MP for photographs where additional detail and cropping flexibility are genuinely useful.
3. Keep Lens Correction Turned On
Have you ever noticed that photographs taken with an iPhone's front or Ultra Wide camera sometimes look slightly stretched around the edges? This happens because wide-angle lenses naturally introduce some distortion, particularly when subjects are close to the edges of the frame.
Apple includes a feature called Lens Correction to address this. It automatically adjusts photographs captured with the front-facing and Ultra Wide cameras to produce more natural-looking results. To check the setting, navigate to Settings > Camera > Lens Correction and make sure it is switched on. It is enabled by default on supported models.
Keeping this feature active is generally a good choice for everyday photography. It can help facial features and objects appear more proportionate, especially when taking group selfies or photographing interiors. However, lens correction is not a substitute for choosing the right shooting distance or angle. Moving too close to someone's face can still create perspective distortion, even when the setting is enabled.
4. Adjust Exposure Instead Of Relying Entirely On Auto Mode
Automatic exposure makes iPhone photography convenient, but it does not always understand which part of a scene matters most to you. For example, when photographing someone standing against a bright window, your iPhone might struggle to balance the subject's face with the brighter background. The result could be an underexposed face or an overly bright background.
You can correct this directly in the Camera app. Open the camera, tap the subject you want to focus on, and look for the exposure adjustment control. Drag the brightness slider upwards or downwards depending on the lighting. A slight reduction in exposure can also help preserve details in bright skies and prevent highlights from appearing completely white.
For situations where you want consistent focus and brightness, touch and hold the subject until AE/AF Lock appears. This locks the automatic exposure and focus while you recompose your shot. You can then make further exposure adjustments where supported. This is especially useful for portraits, product photography, and photographs taken in challenging lighting conditions.
5. Experiment With Photographic Styles
If your photographs sometimes look too warm, too cool, too saturated, or simply different from the mood you wanted, Photographic Styles are worth exploring. Unlike applying a filter after taking a picture, these styles influence the camera's image processing while retaining a more natural-looking treatment of different parts of the image.
Open the Camera app and access the camera controls or swipe up from the shooting modes to find Styles on supported iPhones. You can preview the available looks and adjust their appearance. Options and customisation controls vary by model, but generally allow adjustments to the overall colour and tone of your photographs.
For everyday pictures, starting with the Standard style is a sensible choice. You can experiment with warmer tones for sunset photographs, richer colours for travel pictures, or a more restrained appearance for portraits. Avoid increasing colour intensity simply because the preview looks attractive. Overly strong adjustments can make skin tones and everyday scenes look unnatural, particularly when lighting is already colourful.
6. Turn On Preserve Settings
Have you ever adjusted your camera settings for a particular photograph, closed the Camera app, and discovered that everything has returned to its previous state? Preserve Settings helps prevent this from happening by allowing your iPhone to remember selected camera preferences.
To access it, go to Settings > Camera > Preserve Settings. Depending on your iPhone model and iOS version, you can choose to retain settings such as Camera Mode, Photographic Style, Creative Controls, Depth Control, Exposure Adjustment, Night Mode, Macro Control, and Live Photo. Not every option is available on every device.
This feature is particularly helpful if you regularly photograph similar subjects or prefer a consistent camera setup. For example, you might want your preferred Photographic Style or last-used camera mode to remain active. Remember that you do not need to enable every available option. Select only the settings you regularly use so that your camera behaves the way you expect when you open it.
7. Use Live Photos According To The Situation
Live Photos capture a short moment of movement and sound around the time you press the shutter. Instead of recording only one still image, your iPhone saves a small sequence that lets you revisit the moments immediately before and after the photograph was taken.
You can enable or disable Live Photos directly from the Camera app using the Live Photo control. On supported iPhones, you can also access additional options through the camera controls. If you regularly prefer still photographs, you can disable Live Photos and use Settings > Camera > Preserve Settings > Live Photo to remember your preference, where available.
Live Photos are particularly useful when photographing children, pets, celebrations, or people who rarely stay still. You can review the captured frames and select a different key photo in the Photos app. However, they are not always necessary. If you are taking pictures of landscapes, documents, or products, standard photographs are usually sufficient and can help you avoid storing unnecessary motion data.
8. Make The Most Of Night Mode
Low-light photography is one area where iPhone camera technology can make a noticeable difference. Night Mode helps capture brighter photographs in darker environments by combining information from multiple exposures. Depending on the lighting and your iPhone model, the camera automatically determines when Night Mode is useful.
When Night Mode becomes available, a moon-shaped icon appears in the Camera app. You can tap it to adjust the exposure duration where supported. A longer capture can collect more light, but it also makes camera movement and subject movement more noticeable. For the clearest results, hold your iPhone steadily or use a tripod when taking photographs in particularly dark conditions.
Night Mode is useful for cityscapes, evening gatherings, indoor scenes, and landscapes after sunset. However, it is not a magic solution for every dark photograph. Moving subjects can still appear blurred, and excessive exposure can make a nighttime scene look unnaturally bright. Let the camera choose an appropriate duration, and avoid moving your phone until the photograph has finished capturing.
9. Manage Macro Control For Close-Up Photography
Macro photography allows you to capture small subjects and details from a very short distance. Think of flower petals, jewellery, insects, food textures, or the fine details of everyday objects. On compatible iPhones, the Ultra Wide camera supports automatic macro photography, allowing the device to switch cameras when you move closer to a subject.
If your iPhone supports Macro Control, navigate to Settings > Camera > Macro Control to enable the camera control. When you approach a subject, you can use the flower-shaped icon in the Camera app to manage automatic macro switching. The exact controls depend on your device and iOS version.
Keeping automatic macro switching available is useful for most close-up photographs, but it can sometimes change the framing unexpectedly. If you prefer more control over which camera is being used, Macro Control lets you manage this behaviour on supported models. Remember to provide enough light and keep your phone steady, as even small movements can affect sharpness when photographing tiny subjects.
10. Review Prioritize Faster Shooting
If you frequently photograph moving subjects, you might want to pay attention to a setting called Prioritize Faster Shooting. This feature changes the way your iPhone processes images, allowing you to capture more photographs when you rapidly press the shutter button.
To check it, open Settings > Camera > Prioritize Faster Shooting. Apple enables this option by default on supported models. Turning it off can give image processing more priority over rapid capture, which may be useful when photographing stationary subjects where you have time to compose each shot carefully.
However, this does not mean that switching it off will automatically make every photograph sharper or more detailed. If you are photographing sports, pets, children, or other fast-moving subjects, the ability to capture several frames quickly can be more valuable than the potential processing difference. Consider your photography habits before changing this setting permanently.
Frequently Asked Questions
Q. Which iPhone camera settings should I change first for better photos?
Start with Grid and Level, Lens Correction, and exposure adjustment. These are practical changes that can improve composition and help you capture more balanced photographs without requiring advanced photography skills.
Q. How can I make my iPhone camera take clearer pictures?
Clean your camera lenses, use adequate lighting, tap your subject to focus, and hold your phone steadily. You can also select a higher supported photo resolution when capturing scenes that benefit from additional detail.
Q. Is 48MP better than 24MP on an iPhone?
48MP captures more image detail and provides additional cropping flexibility in suitable lighting. However, 24MP is sufficient for most everyday photographs and generally offers a more practical balance between detail and storage.
Q. Should I keep Lens Correction turned on?
Yes, keeping Lens Correction enabled is generally recommended. It helps reduce distortion in photographs taken with the front and Ultra Wide cameras on supported iPhones.
Q. Does Night Mode improve every low-light photograph?
Not necessarily. Night Mode can improve detail and brightness in dark scenes, particularly when your phone is held steadily. However, moving subjects may still appear blurred during longer exposures.
Q. What is the best Photographic Style for iPhone photography?
There is no single best style for every situation. Standard is a good starting point for natural-looking photographs, while other styles can help you achieve warmer tones, richer colours, or a different overall appearance.
Q. Do higher-resolution iPhone photographs take up more storage?
Generally, yes. Higher-resolution photographs can occupy more storage, particularly when captured in formats such as Apple ProRAW. The actual file size depends on the device, format, and image content.
Q. Should I keep Live Photos turned on all the time?
It depends on what you photograph. Live Photos are useful for capturing movement and selecting a different key frame, but standard photographs are usually sufficient for landscapes, documents, and product pictures.
Q. Can I use these camera settings on older iPhone models?
Most basic adjustments, including focus, exposure, and composition tools, are available across many iPhone generations. However, resolution options, Macro Control, Night Mode, and Photographic Styles depend on the specific model and software version.
Q. Do iPhone camera settings make a difference without editing apps? Absolutely. Adjusting exposure, improving composition, selecting appropriate resolution, and using the right camera features can improve photographs before you even open an editing app. Good lighting and steady shooting also make a considerable difference.
Final Recommendation
You do not need to change every iPhone camera setting to become a better photographer. Start with Grid and Level, keep Lens Correction enabled, learn to adjust exposure, and choose a resolution that suits your photography and storage requirements. These adjustments can improve everyday photographs without making the shooting process complicated.
For people who regularly photograph pets, travel destinations, food, or family gatherings, features such as Live Photos, Night Mode, and Macro Control can provide additional flexibility. If you prefer editing your photographs, explore higher-resolution options and supported ProRAW capabilities, keeping in mind their larger storage requirements.
Most importantly, remember that camera settings work best when they complement good photography habits. Pay attention to lighting, composition, focus, and shooting distance. Experiment with the available controls, understand what each one does, and build a setup that works for your photography style. The best iPhone camera settings are ultimately the ones that help you capture the photographs you actually want.
Ready to upgrade your tech?
Browse our collection of quality refurbished products at unbeatable prices.