White Balance Explained: How to Fix Orange and Blue Photos
Understand white balance, color temperature, and Kelvin settings. Learn how to fix orange and blue photos using camera presets, manual adjustments, and editing tools like Adobe Lightroom.

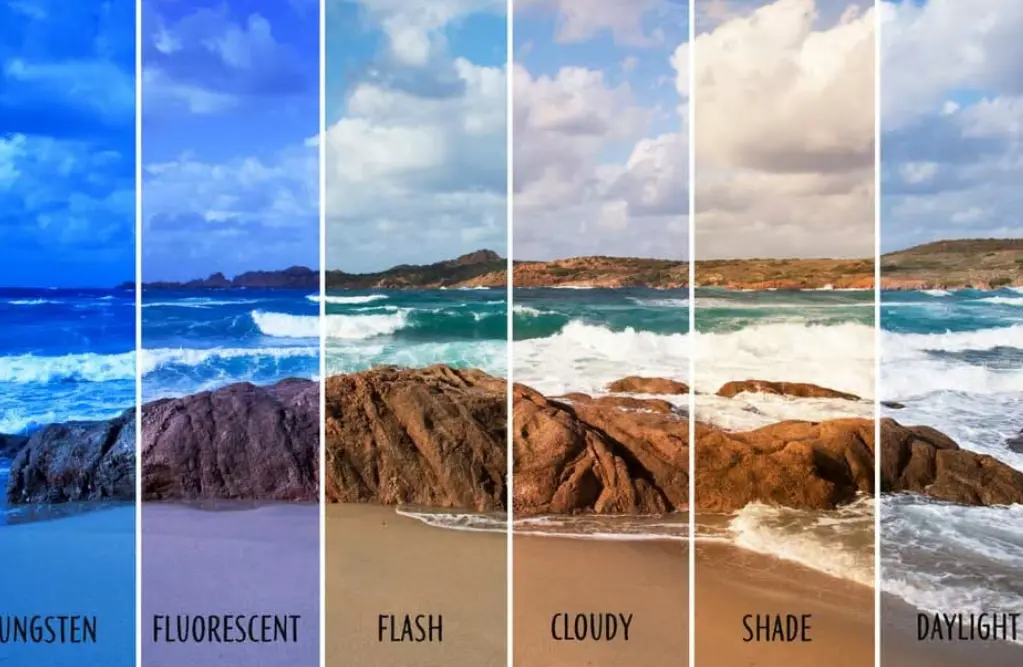
TL;DR: White balance controls how a camera interprets the color of light so that whites, grays, and other colors appear natural in a photograph. Incorrect settings can make pictures look too orange, yellow, or blue, even when the lighting looked perfectly normal to your eyes. By understanding color temperature, Kelvin settings, and tint adjustments, you can correct these color casts directly in your camera or through editing software such as Adobe Lightroom. Whether you are photographing people, products, landscapes, or indoor scenes, getting white balance right can make your pictures look more realistic and visually balanced.
What Is White Balance In Photography?
Have you ever taken a photograph indoors and noticed that everything looks unusually yellow or orange? Or perhaps you photographed a beautiful outdoor scene only to find that the image looked too blue? These issues are often caused by incorrect white balance. White balance is a camera setting that adjusts the overall color tones of an image according to the lighting conditions in which the photograph was taken.
Our eyes naturally adapt to different types of lighting. A white wall generally looks white to us whether we are standing outside on a sunny afternoon or inside a room with warm artificial lighting. Cameras, however, rely on image processing to interpret these changes. White balance helps the camera compensate for the color of the light so that neutral objects appear closer to their actual colors.
Getting white balance right is particularly important in product photography, portraits, food photography, and professional content creation. Incorrect color tones can make skin look unnatural, product colors appear inaccurate, and otherwise beautiful photographs look poorly edited. Understanding this setting gives you greater control over the final appearance of your images.
Understanding Color Temperature And Kelvin
Color temperature describes the color appearance of a light source and is measured in Kelvin (K). It helps explain why some lighting conditions produce warm, yellowish images while others create cooler, bluish photographs. For example, traditional incandescent bulbs produce warm light, whereas open shade and some overcast conditions can produce cooler-looking light.
An important detail is that the color temperature of the light and the Kelvin setting on your camera work in opposite directions when correcting an image. If a photograph looks too orange, lowering the camera's white-balance Kelvin setting generally makes the image cooler. If it looks too blue, increasing the setting makes it warmer.
Here is a general reference for understanding common lighting conditions:
| Lighting Condition | Approximate Color Temperature |
|---|---|
| Candlelight | 1,800–2,000K |
| Warm incandescent lighting | 2,700–3,200K |
| Warm indoor LED lighting | 2,700–3,000K |
| Fluorescent lighting | Varies by type |
| Daylight | Around 5,200–5,600K |
| Cloudy daylight | Around 6,000K |
| Open shade | Around 7,000K or higher |
These values are approximate rather than fixed rules. Actual lighting varies depending on the bulb, weather, surroundings, and time of day.
Why Do Photos Look Too Orange Or Too Blue?
Color casts usually appear when the camera's white-balance setting does not match the lighting conditions. This can happen when shooting indoors, moving between different environments, or relying entirely on automatic white balance. Understanding the reason behind each color cast makes it easier to correct the problem.
Orange And Yellow Color Casts
Orange or yellow photographs commonly occur under warm artificial lighting, particularly traditional incandescent bulbs. If the camera does not compensate sufficiently for this warm light, neutral surfaces such as white walls, clothing, and furniture can appear yellowish. Skin tones may also look unusually orange.
Blue Color Casts
Blue photographs can occur when shooting under open shade, overcast skies, or cooler lighting conditions. If the camera applies an unsuitable white-balance setting, the resulting image may appear excessively cool. White objects can look bluish, and skin tones may lose their natural warmth.
Green And Magenta Color Casts
Not every color problem is related to temperature. Certain fluorescent lights and some LED sources can introduce green or magenta color shifts. This is where the Tint adjustment becomes useful. Temperature primarily controls the blue-to-yellow balance, while Tint adjusts the green-to-magenta balance.
How To Fix Orange And Blue Photos In Camera
Correcting white balance while taking a photograph is usually easier than trying to repair every image later. Most DSLR and mirrorless cameras offer several white-balance presets, while many smartphones provide automatic adjustments or manual controls.
Step 1: Use Auto White Balance
Auto White Balance (AWB) allows your camera to analyze the lighting and automatically select an appropriate color balance. It is a convenient starting point for everyday photography, particularly when lighting conditions change frequently.
However, automatic white balance is not always perfect. A sunset, warm indoor environment, or scene dominated by a particular color may confuse the camera's interpretation. If the results look unnatural, switching to a preset or manually adjusting Kelvin values can provide better control.
Step 2: Choose The Correct White Balance Preset
Most cameras include presets designed for common lighting conditions. Selecting the appropriate preset tells the camera how to compensate for the light source.
| White Balance Preset | Best Used For |
|---|---|
| Auto | Changing or mixed lighting conditions |
| Daylight | Bright outdoor sunlight |
| Cloudy | Overcast outdoor conditions |
| Shade | Areas without direct sunlight |
| Tungsten | Traditional warm incandescent bulbs |
| Fluorescent | Supported fluorescent lighting types |
| Flash | Photography using compatible flash lighting |
| Custom | Specific or mixed lighting conditions |
For example, if indoor photographs look too orange under traditional incandescent bulbs, try the Tungsten preset. If outdoor photographs look too blue in open shade, try the Shade preset rather than automatically increasing exposure or saturation.
Step 3: Adjust Kelvin Manually
If your camera offers a Kelvin adjustment, you can fine-tune white balance instead of relying on presets. Lower the Kelvin setting to make an overly warm image cooler. Increase it to make an overly cool image warmer.
Try small adjustments and review the result on your camera screen. Avoid making extreme changes immediately, as they can introduce an unnatural appearance. The ideal setting depends on the actual lighting and the look you want to achieve.
How To Fix White Balance In Photo Editing Software
Sometimes, you may not notice an incorrect white balance until you transfer photographs to your computer or phone. Fortunately, editing software offers practical tools for correcting these color problems without having to retake the photograph.
Step 1: Adjust Temperature In Adobe Lightroom
Open your photograph in Adobe Lightroom and navigate to the Color or Edit panel, depending on the version you are using. Locate the Temperature slider under White Balance.
If the photograph looks too orange or yellow, move the Temperature slider towards cooler tones. If it appears too blue, move it towards warmer tones. Watch neutral areas such as white clothing, gray surfaces, and walls while making adjustments.
Step 2: Use The Tint Slider
After correcting temperature, examine the photograph for green or magenta color casts. Use the Tint slider to balance these colors.
Move the slider towards magenta if the image looks too green, and towards green if it appears excessively magenta. Make gradual adjustments rather than trying to correct every color difference with a single slider.
Step 3: Use The White Balance Eyedropper
Lightroom and Adobe Camera Raw offer a White Balance Selector or eyedropper tool. Select a suitable neutral gray or white area in the photograph, and the software will use that selection to calculate a white-balance correction.
Avoid clicking on highly reflective highlights, bright light sources, or areas that are not genuinely neutral. A neutral gray surface with visible detail is generally a better reference. After using the eyedropper, fine-tune Temperature and Tint manually if necessary.
RAW Vs JPEG: Which Format Makes White Balance Easier?
The file format you choose can affect how easily you can correct white balance during editing. RAW and JPEG photographs both allow adjustments, but they do not retain the same amount of original image information.
RAW files preserve substantially more image data and generally offer greater flexibility when adjusting white balance during post-processing. The camera records its white-balance choice as metadata, allowing compatible editing software to interpret or change that setting during development.
JPEG files, on the other hand, have already undergone in-camera processing, including the application of white balance. You can still correct an orange or blue color cast in editing software, but extreme adjustments may reveal unwanted color shifts, banding, or loss of image quality.
| Feature | RAW | JPEG |
|---|---|---|
| White Balance Flexibility | Greater | More limited |
| Editing Control | Extensive | Comparatively limited |
| File Size | Usually larger | Usually smaller |
| In-Camera Processing | Minimal or camera-dependent | Processed |
| Best For | Professional editing | Everyday photography and sharing |
If you regularly edit photographs or work with product images, RAW is generally the better choice when your camera supports it. JPEG remains convenient for quick sharing and everyday photography.
Common White Balance Mistakes To Avoid
One common mistake is assuming that Auto White Balance will always produce accurate results. Although it works well in many situations, mixed lighting and strongly colored surroundings can affect its judgment. Checking the preview and adjusting the setting when necessary can save considerable editing time.
Another mistake is confusing exposure with white balance. Increasing brightness does not remove an orange or blue color cast. Similarly, increasing saturation may make incorrect colors even more noticeable. Temperature and Tint should be adjusted first when the problem is a color imbalance.
Finally, avoid correcting every photograph until it looks perfectly neutral. White balance is also a creative tool. A warm sunset, golden-hour portrait, or cool winter landscape may look better when some of its natural color character is preserved. The goal is to achieve the intended appearance, not remove every trace of warmth or coolness.
Final Recommendation And Decision Framework
White balance is one of the simplest camera settings to understand, yet it can make a noticeable difference to the quality of your photographs. Whether you are dealing with orange indoor pictures or blue outdoor shots, learning how Kelvin and Tint adjustments work gives you better control over color accuracy.
For everyday photography, start with Auto White Balance and switch to a suitable preset when the results look unnatural. If your camera supports manual Kelvin adjustments, use them to fine-tune the image. For photographs that need more detailed editing, shoot in RAW whenever practical and use Lightroom or Adobe Camera Raw to correct temperature and tint.
Most importantly, remember that accurate white balance does not always mean perfectly neutral colors. Sometimes a little warmth makes a portrait more inviting, while cooler tones can give a landscape a more natural atmosphere. Learn to correct unwanted color casts first, then use white balance creatively to give your photographs the look and feel you want.
Frequently Asked Questions
Q. What is white balance in photography?
White balance is a camera setting that adjusts image colors according to the lighting conditions so that white and neutral objects appear natural.
Q. Why do my photos look orange or yellow?
This usually happens when the camera does not compensate sufficiently for warm lighting, such as traditional incandescent bulbs.
Q. How do I fix blue photos?
Increase the camera's Kelvin white-balance setting or move the Temperature slider towards warmer tones in editing software.
Q. What Kelvin setting should I use for daylight photography?
Around 5,200–5,600K is a useful starting point for daylight photography, although actual lighting conditions may require adjustments.
Q. Does a higher Kelvin setting make photos warmer?
Yes. Increasing the camera's Kelvin white-balance setting generally makes the image warmer, while decreasing it makes the image cooler.
Q. What is the difference between Temperature and Tint?
Temperature adjusts the blue-to-yellow color balance, while Tint adjusts the green-to-magenta balance.
Q. Is Auto White Balance good for beginners?
Yes. It is a convenient starting point for everyday photography, although manual presets may produce better results in challenging lighting.
Q. Can I fix white balance after taking a photograph?
Yes. Editing applications such as Adobe Lightroom and Camera Raw allow you to adjust temperature and tint after capturing an image.
Q. Is RAW better than JPEG for white-balance correction?
RAW generally offers greater flexibility because it preserves more original image information and allows white balance to be adjusted during processing.
Q. Does white balance affect skin tones?
Yes. Incorrect white balance can make skin appear too orange, yellow, blue, green, or magenta. Correct adjustments help produce more natural-looking skin tones.
Ready to upgrade your tech?
Browse our collection of quality refurbished products at unbeatable prices.