How to Clean a Camera Sensor and Lens at Home Without Damaging Them
Learn how to clean your camera sensor and lens at home without causing scratches or damaging delicate coatings. Discover the right tools, safe cleaning methods, and when professional sensor cleaning is the better option.

TL;DR Cleaning a camera sensor and lens at home is manageable when you use the right tools and avoid unnecessary contact with delicate surfaces. Start by removing loose dust with a manual air blower, then use a clean microfiber cloth or lens tissue with an appropriate optical cleaning solution for stubborn marks on the lens. Sensor cleaning requires greater care because the imaging surface and its protective filter assembly can be damaged by incorrect handling. Begin with your camera's built-in sensor cleaning function, follow the manufacturer's instructions for manual cleaning, and avoid compressed air, household cleaners, and direct contact with the sensor. If oily residue or stubborn marks remain, professional cleaning is usually the safer choice.
Why Camera Sensor and Lens Cleaning Matter
Dust, fingerprints, and smudges can affect image quality, particularly when you photograph bright skies, landscapes, or subjects against plain backgrounds. Dust on the front lens element may reduce contrast or create unwanted flare, while greasy fingerprints can leave visible marks and interfere with light transmission. Sensor dust behaves differently because it appears as dark spots in photographs, often becoming more noticeable when you use a narrow aperture. Understanding where the contamination sits helps you choose the right cleaning method instead of repeatedly wiping the wrong surface.
A camera sensor is considerably more delicate to handle than the outside of a lens. Interchangeable-lens cameras expose the sensor area when you remove the lens, allowing dust to enter the camera body. However, the surface visible inside the mount is generally covered by a protective filter assembly, so it is best not to assume that the bare silicon sensor is directly exposed. Even so, this area requires careful handling, and an accidental touch or unsuitable cleaning product can cause expensive damage. Sony and Canon both recommend gentle dust removal and warn against touching the sensor surface or using pressurized air.
Regular maintenance does not mean cleaning your camera every time you finish shooting. Excessive cleaning can introduce additional dust, create scratches, or damage coatings through repeated wiping. Instead, inspect the lens when image quality seems affected and check for sensor dust when you notice recurring spots in photographs. A simple blower may be all you need for routine maintenance, while more persistent contamination calls for a different approach. The goal is to remove actual dirt without turning a minor cleaning task into an avoidable repair.
How to Identify Dust on Your Camera
Dust on the lens may appear as haze, reduced contrast, or visible smudges, although a few particles on the front element will not necessarily affect every photograph. Sensor dust is easier to identify when the same small dark marks appear in the same relative positions across multiple images, particularly when photographing a plain, bright surface at a narrow aperture.
Tools You Need Before Cleaning Your Camera
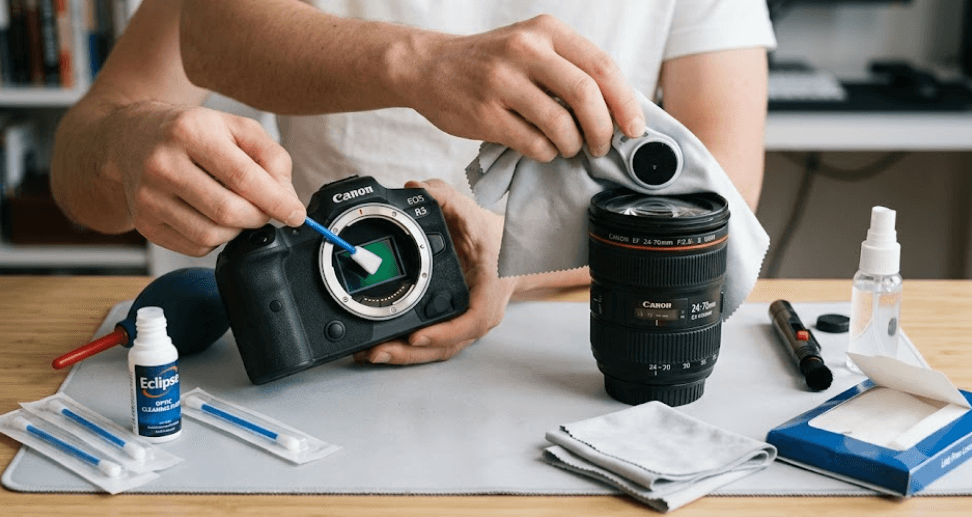
The safest cleaning process begins with the right equipment. A manual rubber air blower is useful for removing loose dust without touching the lens or sensor area. A clean microfiber cloth and optical-grade lens tissue can help remove fingerprints from lens surfaces, while a cleaning solution specifically designed for camera optics may be useful for stubborn oily marks. These tools are designed for delicate optical surfaces and are preferable to ordinary household cleaning products.
You do not need an expensive professional kit for basic lens maintenance. However, the quality and cleanliness of your equipment matter more than the number of accessories you own. A cloth that has collected grit, dust, or residue can scratch a lens coating when rubbed across the surface. Keep cleaning materials in a clean pouch, replace damaged or dirty cloths, and avoid using the same cloth for camera bodies, greasy surfaces, and optical elements without checking that it is clean.
Sensor cleaning tools require more careful selection. If your camera's built-in cleaning function and a manual blower do not remove the dust, a compatible sensor swab and sensor-specific cleaning fluid may be appropriate for some camera models. However, direct sensor cleaning is not the same as wiping a lens, and manufacturers may recommend professional service instead. Check your camera's official manual before purchasing or using a wet-cleaning kit.
| Cleaning Tool | Main Purpose | Important Precaution |
|---|---|---|
| Manual air blower | Removes loose dust | Never let the nozzle touch the sensor |
| Microfiber cloth | Removes lens fingerprints | Use a clean, grit-free cloth |
| Lens tissue | Cleans delicate optical surfaces | Use fresh tissue for each cleaning |
| Lens cleaning solution | Helps remove oily lens marks | Apply to the cloth, not directly to the lens |
| Compatible sensor swab | Removes stubborn sensor contamination | Use only if the camera manufacturer permits it |
How to Clean a Camera Lens at Home
Remove Loose Dust Before Wiping
Begin by switching off your camera and placing it on a stable surface in a clean, low-dust environment. Remove the lens cap and inspect the front element under good lighting. Use a manual blower to dislodge loose dust before bringing a cloth into contact with the glass. This step is important because wiping across dry particles can drag abrasive debris over the lens coating and leave fine scratches. Avoid blowing on the lens with your mouth because saliva can leave marks that are harder to remove than ordinary dust.
Once loose particles have been removed, check whether the lens still has fingerprints, oily smears, or dried spots. If the glass looks clean, stop there rather than polishing it unnecessarily. If marks remain, use a clean microfiber cloth or lens tissue designed for optical surfaces. Follow the cleaning product's instructions and use gentle movements rather than pressing hard against the glass. A clean lens should not require forceful rubbing.
Remove Fingerprints and Stubborn Marks
For greasy fingerprints, lightly dampen a clean lens cloth or lens tissue with a manufacturer-approved optical cleaning solution. Wipe gently from the center of the lens toward the outer edge, following the cleaning product's directions. Do not spray or pour liquid directly onto the lens because excess fluid can seep around the edges and reach internal components. Canon specifically advises using a blower for lens dust and avoiding cleaners containing organic solvents on camera equipment. <Cite refs={["turn462467search6","turn462467search7"]}/>
After cleaning, inspect the lens again under indirect light. A few harmless particles outside the image-forming area are not necessarily a reason to repeat the process. If a mark remains despite gentle cleaning, do not keep scrubbing in an attempt to remove it. The residue could be on an internal element, or the mark could be damage to the coating rather than dirt. Internal lens cleaning is best left to an authorized technician.
How to Clean a Camera Sensor Safely
Start With the Built-In Sensor Cleaning Function
Before attempting manual sensor cleaning, check whether your camera has an automatic sensor cleaning feature. Many interchangeable-lens cameras use vibration to dislodge dust from the sensor assembly. Run the function according to the camera's instructions, then take a test photograph to see whether the spots have disappeared. This is the least invasive first step and may resolve minor dust problems without requiring direct access to the sensor area.
If dust remains, consult the camera's manual for its recommended manual cleaning procedure. The process differs between DSLR and mirrorless models, so do not assume that instructions for one camera apply to another. Canon, for example, provides model-specific instructions for manual cleaning and warns that an interruption to power during certain DSLR cleaning procedures can damage the shutter mechanism. Follow the exact power and menu instructions for your camera rather than improvising.
Use a Manual Blower for Loose Sensor Dust
If the manufacturer permits manual blower cleaning, prepare the camera in a clean environment and ensure the battery has sufficient charge. Remove the lens according to the camera's instructions and activate the appropriate sensor-cleaning mode if required. For compatible cameras, hold the body with the mount angled slightly downward so loose dust can fall out rather than settle back inside. Use a plain manual blower and direct gentle puffs of air toward the sensor area without touching the surface or inserting the nozzle beyond the lens mount.
Never use canned air, compressed-air sprays, or a brush attached to a blower against the sensor. Pressurized gas can damage delicate components, and propellant may leave residue or freeze on the surface. Do not blow on the sensor with your mouth or touch it with your fingers. Sony specifically recommends a plain blower and warns against direct sensor contact and air dusters.
If the dust remains after a few gentle attempts, stop and reassess. A blower cannot reliably remove oily residue, adhered particles, or other stubborn contamination. Wet cleaning may be possible with a sensor-specific swab that exactly matches the sensor format, but the procedure and acceptable products vary by manufacturer and camera. If you have never cleaned a sensor directly, or the contamination will not come off easily, professional cleaning is the safer option.
Common Camera Cleaning Mistakes to Avoid
One of the most common mistakes is treating a camera like a phone screen or a household glass surface. Window cleaner, general-purpose sprays, paper towels, tissues, and ordinary clothing are not suitable substitutes for optical cleaning materials. Some products contain solvents or additives that can damage coatings or leave residue. Even a soft cloth can become abrasive when it picks up grit, so cleanliness matters as much as softness.
Another mistake is using excessive force or cleaning too frequently. Repeatedly wiping a lens that only has a few harmless dust particles can introduce more risk than benefit. On the sensor side, touching the surface, inserting tools too far into the mount, or using an unsuitable swab can damage delicate components. Do not assume that every cleaning kit is compatible with every camera, and do not follow a tutorial without checking whether its procedure matches your specific model.
Finally, do not try to fix internal contamination yourself. Dust inside a lens, persistent sensor marks, scratches, fungus, or moisture-related haze may require professional inspection. A sensor spot that remains after automatic cleaning and careful blower use should not lead to increasingly aggressive DIY methods. Stop when a problem requires contact with a delicate surface or when you are unsure what the mark actually is.
| Mistake | Why It Is Risky | Safer Alternative |
|---|---|---|
| Using canned air | Excessive pressure or propellant can cause damage | Use a manual blower |
| Wiping a dusty lens immediately | Grit may scratch the coating | Blow away loose dust first |
| Applying cleaner directly to glass | Liquid may seep into the lens | Apply a small amount to a cloth |
| Touching the sensor | May leave residue or cause damage | Keep tools clear of the surface |
| Using household cleaners | Ingredients may harm coatings | Use an optical-safe product |
| Repeatedly scrubbing stubborn marks | Can worsen damage | Seek professional cleaning |
How to Check Whether Your Camera Is Clean
After cleaning the lens, inspect it under good lighting to confirm that fingerprints and obvious smears have been removed. Then take a few ordinary photographs and compare their clarity with images taken before cleaning. Remember that a lens does not need to look absolutely spotless under every angle of light to produce good photographs. A few tiny particles may have no visible impact, so avoid repeating the cleaning process simply because you can still see dust under close inspection.
To check for sensor dust, photograph a plain, evenly lit surface such as a white wall or bright sky. Use aperture-priority mode where available and select a narrow aperture, such as f/11, following your camera manufacturer's guidance. Keep the surface evenly exposed and inspect the resulting image for recurring dark spots. The exact visibility of dust depends on the lens, aperture, lighting, and camera, so this test is a practical check rather than a guarantee that every particle will be visible. Sony recommends a similar test using a bright, plain subject at f/11. <Cite refs={["turn462467search7"]}/>
If the same spots remain in the same image positions after the camera's automatic cleaning and a permitted blower procedure, the sensor may need professional attention. Before booking service, check that the spots are not caused by the lens, the subject, or another part of the imaging system. If you are uncertain, a camera technician can help identify the source and clean the appropriate component. This is particularly worthwhile for expensive equipment, weather-sealed bodies, and cameras still covered by warranty.
Final Recommendation
Cleaning a camera sensor and lens at home is safest when you use a gentle, step-by-step approach and recognize when to stop. For lenses, begin with a manual blower, then use a clean microfiber cloth or lens tissue with a suitable optical cleaner only when necessary. For sensors, start with the camera's built-in cleaning function and use a manual blower only in the manner permitted by the manufacturer. Avoid canned air, household cleaning chemicals, direct contact with the sensor, and unnecessary repeated wiping.
If a lens has internal haze or a sensor has persistent smudges that a blower cannot remove, professional cleaning is a sensible investment in protecting your equipment. A service fee is usually easier to manage than damage caused by an unsuitable tool or an improvised cleaning method. Ultimately, the best camera maintenance routine is not the one that uses the most products. It is the one that removes genuine contamination while minimizing contact with delicate optical surfaces.
Frequently Asked Questions
Q. How often should I clean my camera sensor?
Clean the sensor only when dust affects your photographs or an inspection shows that cleaning is necessary. Use the built-in cleaning function first and avoid repeated manual cleaning without a clear reason.
Q. Can I clean my camera sensor at home?
You can use the built-in cleaning function and, where the manufacturer permits it, a manual blower. Direct or wet sensor cleaning requires more care, so consider professional service if you are inexperienced.
Q. Can I use compressed air to clean my camera sensor?
No. Avoid canned or pressurized air because the force and propellant can damage the sensor assembly or leave contamination. Use a manual camera blower instead.
Q. Can I use a microfiber cloth on a camera lens?
Yes, provided it is clean and designed for delicate optical surfaces. Remove loose dust with a blower first so grit does not get dragged across the lens coating.
Q. Can I use alcohol to clean a camera lens?
Do not assume that ordinary rubbing alcohol is safe for every lens coating. Use a cleaning solution specifically intended for camera optics and follow the lens manufacturer's instructions.
Q. Why do dark spots appear in my photographs?
Recurring dark spots, particularly at narrow apertures, may be caused by dust on the sensor's protective filter assembly. Photograph a plain, bright surface to check whether the spots appear consistently.
Q. Should I remove the lens before cleaning the sensor?
For manual cleaning, the lens generally needs to be removed, but the exact procedure depends on your camera. Follow the manufacturer's instructions for powering the camera and activating its cleaning mode.
Q. Can I use a brush to clean my camera sensor?
Do not use an ordinary brush on the sensor. A brush can transfer dirt or scratch delicate surfaces. Follow your manufacturer's approved procedure and use a plain blower for loose dust when permitted.
Q. What should I do if sensor dust does not come off?
Stop rather than repeatedly wiping or blowing at the surface. Stubborn residue may require a compatible sensor-cleaning procedure or professional service.
Q. Does cleaning a camera lens improve image quality?
Removing fingerprints, oily smears, and significant contamination can improve contrast and reduce unwanted flare. However, minor dust on the front element may have little visible effect, so clean when needed rather than excessively.
Ready to upgrade your tech?
Browse our collection of quality refurbished products at unbeatable prices.